Welcome to the first part of this four part guide on how to create time lapse films. In this first part of the guide, we’ll cover the basics of time lapse, including some of its common uses for filming along with how it could be applicable to you or your business as a unique filming technique. Each part of this four part guide will be released on a weekly basis and will focus on a different aspect of time lapse photography. Stick with us and over the course of the next month you’ll build a foundational level of understanding when it comes to time lapse filming. This will in turn ensure that you are capably able to produce your own time lapse films. So lets get started!
the basics of time lapse
Time lapse photography is a technique of recording images of a scene/subject that changes or develops at a rate so slow that it may barely be perceived in real time, normally from a fixed position, and playing back those images at a much faster rate. As such the technique is typically used to effectively show an activity or event that might occur over hours, days or even years- in only a few seconds of playback. In addition to real factors like equipment budget and access to a physical location, the potential outcomes of a time lapse video are only limited by creative intent. Furthermore with technology advancing at a relentless pace, options to novice and seasoned time lapse photographers alike are constantly increasing.
As humans our brains can make sense of moving pictures with a frame rate as low as 16 frames per second (fps) and up to about 40 frames per second before we can psychologically start to ‘reject’ footage for being ‘too real’. In the 1920s a standard was set for film where moving images would be captured (and projected in the movie theatres) at 24 frames per second. This was a balance of cost, practicality and showing a moving image that people comfortably accepted. In part this ‘conditioning’ of us by cinema (and later, TV) means we typically perceive real time video played back between 24 and 30 frames per second as natural looking. Here in the UK our television shows are played at 25fps which is really handy for making easy calculations for time lapse. This is something we’ll touch on it a bit.
Without delving too far into the details, historically the use of time lapse photography has led to greater scientific understanding, documented changing landscapes (both naturally occurring and manufactured) and more recently found use as a creative film making tool utilising the aesthetic quality inherent in the technique. In all cases the common factor leading to a successful time lapse is that the subject or event captured happens over a relatively long period of time.
time lapse subject ideas
You may or not have a few ideas already for what you want to capture using time lapse, or you may be wondering how time lapse photography could be applicable to marketing or promotion films for your business or event. As previously mentioned, time lapse typically works most effectively with events/projects that have a substantial duration and this is going to be one of the biggest factors to consider. We time lapse the most when capturing projects with a substantial duration, particularly if the time lapse is serving as the core of the film.
This is because alongside being visually stimulating, as previously mentioned time lapses also have the functional use of symbolising the passing of time in a unique way. For example in many of our films we often use time lapses as a smooth way of transitioning from day to night and night to day (such as our ‘East Midlands Runway Refurbishment’ film for Galliford Try). This helps emphasise a projects or events duration to viewers. So if you’re looking to effectively document a project or event with some reasonable length to it, time lapse filming should be a major consideration.
However, whether your time lapse looks visually interesting or not is going to highly depend on the subject matter itself. A good way of examining if your planned time lapse is going to look interesting is to consider if there are going to be substantial and noticeable differences happening in frame that will be picked up in the time lapse. From here you can determine whether you need to rethink the angle you wish to shoot your time lapse from, or if perhaps there is a more suited filming method to use altogether. Below are just a few general recommendations for subjects that we’ve found to be visually engaging when captured with time lapse.
- Sunrise/sunsets
- Clouds moving (their movement really helps communicate the passage of time)
- Celestial motion (e.g. stars, moon, meteor showers)
- Plant life (such as plants growing and flowers opening)
- Other unique feats of nature (Such as ice melting or natural landscape changes)
- Building construction/demolition
- Event set ups
- People moving around
SHOOTING CONSIDERATIONS
So let’s go back to our frame rate of 25fps. That means for every second of film we see, 25 images are played, one after the other. Four seconds of video would be a total of 100 frames played and a minute of footage would be made up of 1500 frames.
A great place to start is researching how long your ‘event’ takes. Are you time lapsing an ice block that will melt in an hour, a flower that will take a day to bloom or a building being demolished over a year? Once you have the amount of time your camera will be used for in mind, you should next consider the interval at which to take your still images.
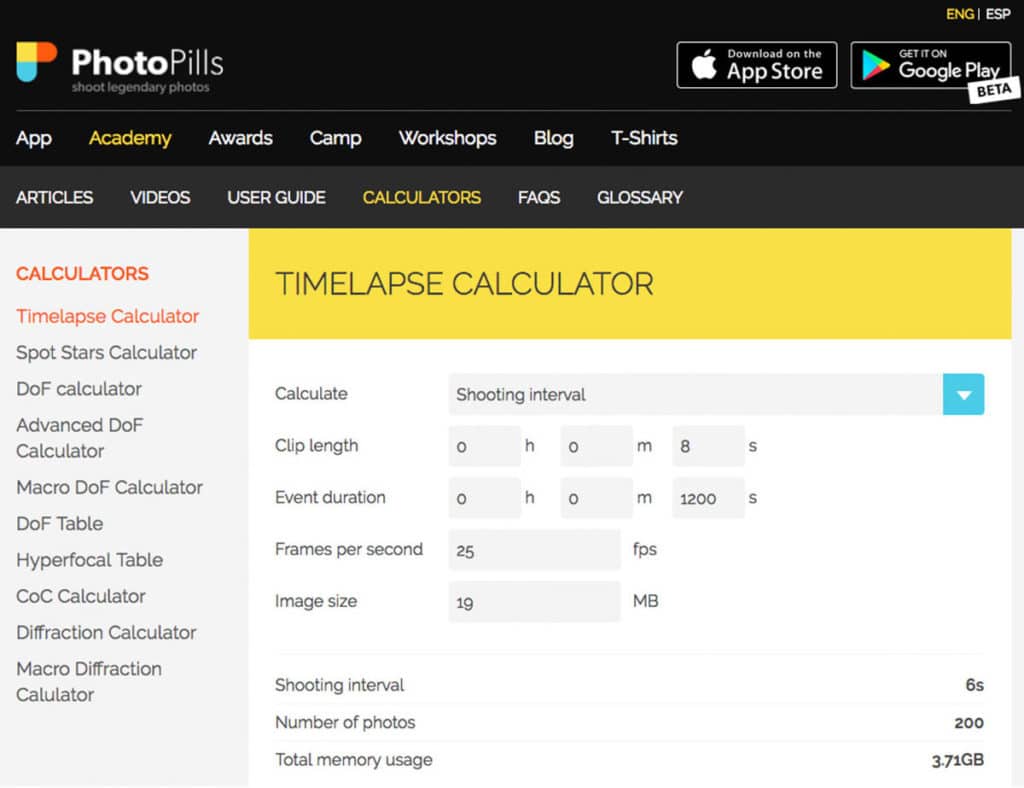
A useful tip is to think about how long you might want your final video to be. Say you knew you were going to time lapse a city street for 20 minutes to capture an essence of the hustle and bustle there. Now let’s say you wanted to show that time lapse in eight seconds of screen time. (Now come your calculations…) First we’ll convert 20 minutes into seconds, that’s 1200s. To achieve our eight seconds of screen time at a frame rate of 25 frames per second you need a total of 200 frames (or images/stills/photographs if you prefer). Then it’s just a case of dividing your 1200 seconds with 200 equal intervals (1200 / 200 = 6). Still here? Cool.
In the above example taking a shot every six seconds for 20 minutes would make eight seconds of video when played back at 25 frames per second. Considering how long your ‘event’ is and how long you want your time lapse film is a good place to start. Your shooting interval is going to be subjective and you can experiment with your shooting intervals. Just remember that a shorter interval will give a ‘smoother’ video output and a longer interval will result in a more ‘blocky’ or ‘jumpy’ output.
If you’d prefer to have the calculations done for you, visit www.photopills.com/calculators/timelapse. Here you will find a rather handy calculator that allows you to calculate file sizes in addition to shooting intervals. This will help you ensure that you have enough storage on your memory card for the time lapse you’re planning.

A screenshot of PhotoPills ‘Time Lapse Calculator’
It is also worth noting that sometimes you will arrive at an interval that you cannot achieve with your equipment practically. Use your discretion here to achieve the best result. For example, a suggested interval of 14.4 seconds could be rounded up to a more easily programmable 15 second interval.
Well, that’s the basics covered! Click here to read the second of our four part series on how to create time lapse films. This focuses on the various kinds of filming equipment that can be used to shoot time lapse photography.
[contact_cta]


